

The Ultimate 15 Stain Removal Guide Every Fashion Girl Needs
Every fashion enthusiast knows that devastating moment when a pristine outfit meets an unexpected stain. Whether you’re navigating a busy workday, enjoying brunch with friends, or attending an important event, stains have an uncanny ability to appear at the worst possible times. But here’s the empowering truth: most stains are not permanent sentences for your favorite garments. With the right knowledge and quick action, you can rescue nearly any piece in your wardrobe from common mishaps.
This comprehensive stain removal guide covers fifteen of the most common clothing catastrophes that fashion lovers face. From morning coffee spills to red wine accidents and makeup transfers, understanding the science behind different stain types and their corresponding treatments will transform you from panicked to prepared. The key lies in recognizing that different stains require different approaches based on their composition. Protein-based stains like blood and sweat respond to cold water and enzymatic treatments, while oil-based stains from makeup and food need grease-cutting solutions. Tannin stains from wine and coffee demand immediate attention and specific removal techniques.
Beyond just treating stains, this guide will teach you prevention strategies, fabric-specific considerations, and emergency solutions for when disaster strikes away from home. You’ll learn which household items double as powerful stain fighters, when to use commercial products, and most importantly, how to avoid common mistakes that can set stains permanently. Consider this your fashion emergency handbook, designed to keep your wardrobe looking impeccable no matter what life throws at it.
Coffee and Tea Stain Removal
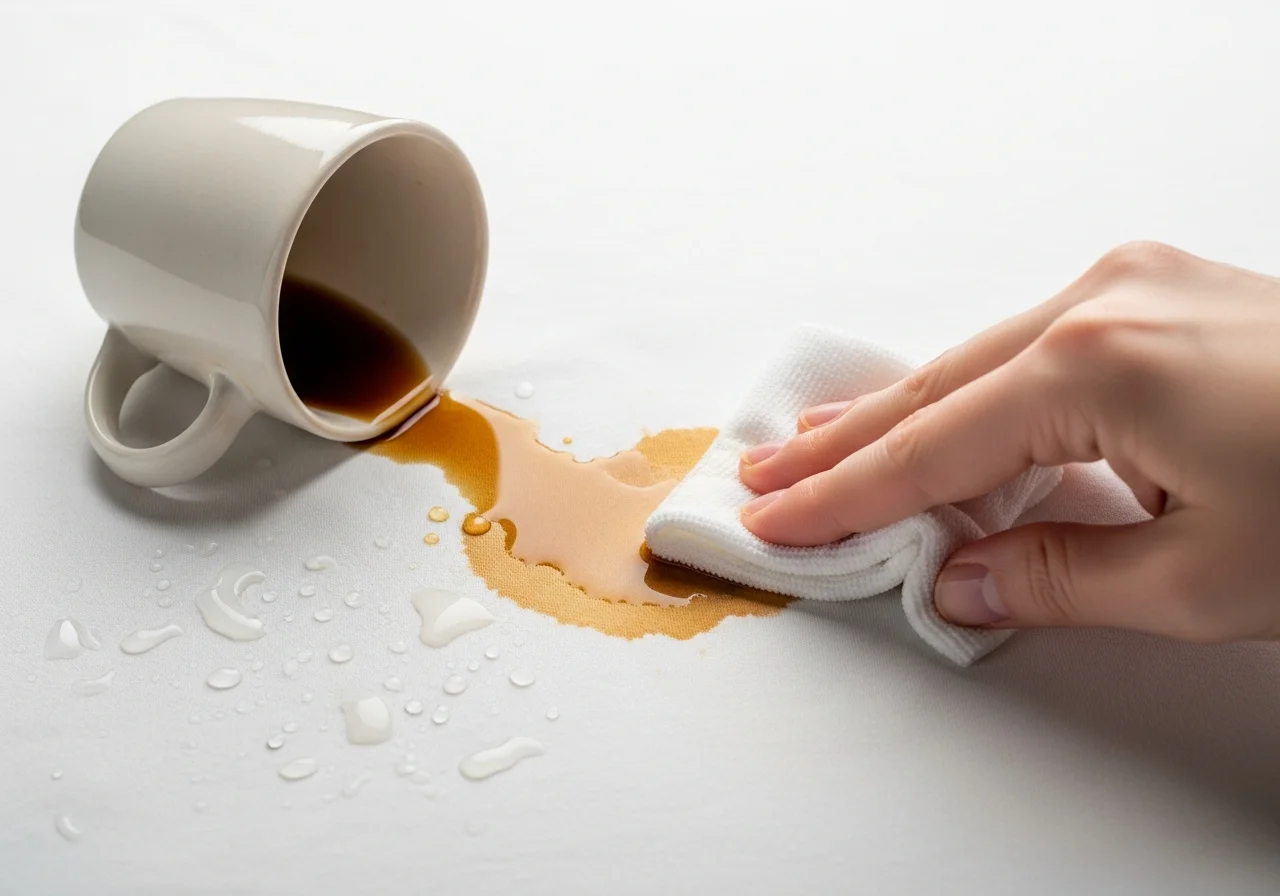
Coffee and tea stains rank among the most frequent culprits in wardrobe mishaps, especially during rushed mornings and afternoon meetings. These tannin-based stains can appear deceptively innocent when fresh but develop into stubborn brown marks if not addressed promptly. The good news is that coffee stain removal becomes significantly easier when you act within the first few minutes.
Start by rinsing the affected area under cold running water from the back of the fabric, which helps push the stain out rather than deeper into the fibers. Create a simple but effective treatment by mixing equal parts white vinegar and cold water, then apply this solution directly to the stain. Allow it to sit for approximately five minutes while the vinegar breaks down the tannin compounds. Gently rub the fabric together to work the solution through the fibers, then rinse thoroughly with cold water before laundering as usual.
For older or set-in coffee stains, you’ll need a more aggressive approach. Make a paste using powdered laundry detergent, cold water, and a tablespoon of distilled white vinegar until it reaches a toothpaste-like consistency. Spread this mixture on both sides of the stained fabric and wait five to ten minutes. Use a soft-bristled brush to work the paste into the fabric using circular motions, which helps lift the stain without damaging the material. Rinse with cold water and pretreat with liquid laundry detergent before washing. Remember that heat is your enemy when dealing with tannin stains, so always check that the stain has completely disappeared before placing the garment in the dryer, as heat will permanently set any remaining discoloration.
Red Wine Stain Removal
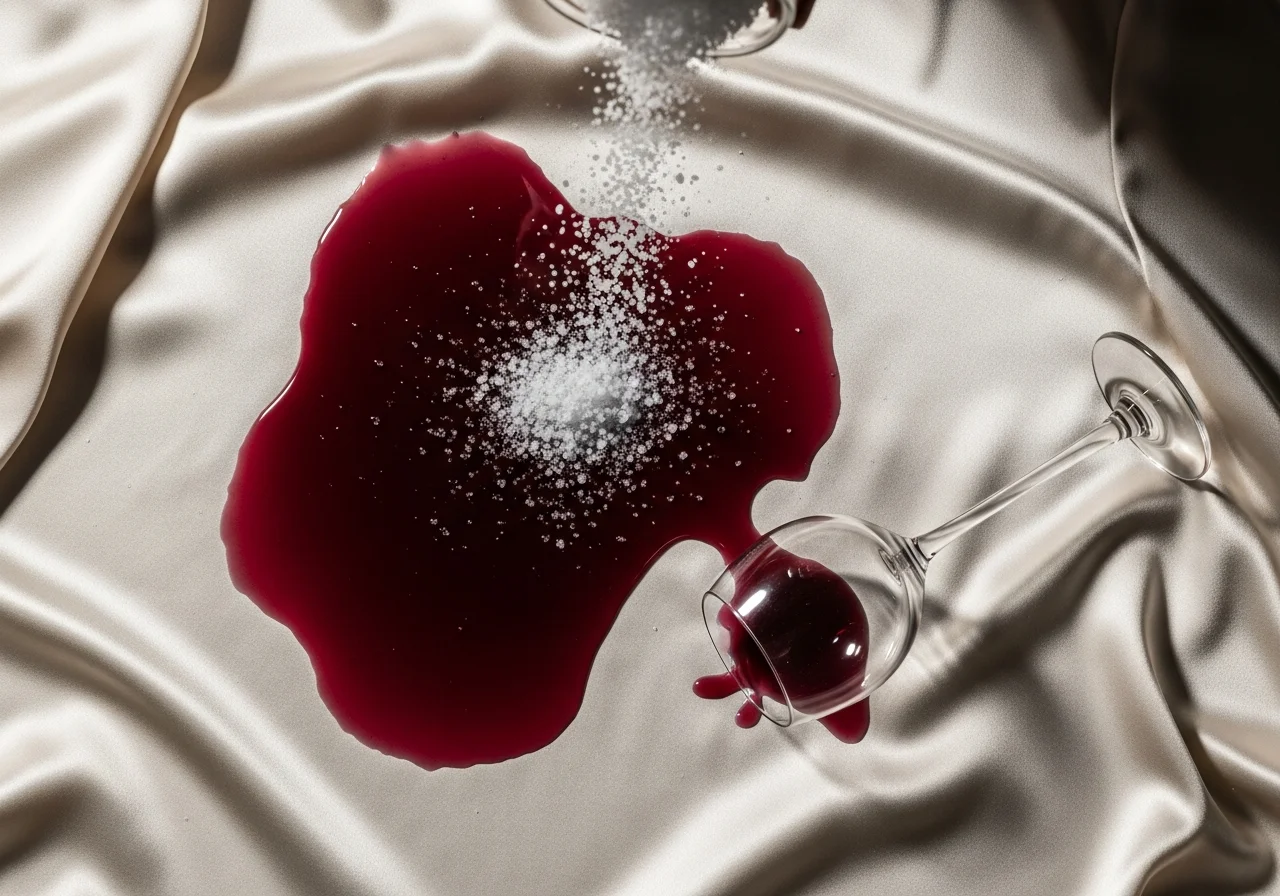
Red wine stains strike fear into the hearts of fashion lovers everywhere, but panic is your worst enemy when facing this common mishap. The anthocyanin pigments in red wine bond quickly with fabric fibers, making speed absolutely essential in successful wine stain removal. Whether you’re at a dinner party or relaxing at home, knowing how to react in those critical first moments can mean the difference between saving and losing a beloved garment.
The moment wine makes contact with your clothing, grab a clean cloth or paper towel and blot the area vigorously. Never rub, as this drives the wine deeper into the fabric and spreads the stain to unaffected areas. Once you’ve absorbed as much liquid as possible, cover the entire stained area generously with table salt or baking soda. These absorbent powders work like tiny sponges, drawing the wine out of the fabric fibers. Let this sit for at least fifteen minutes, watching as the white powder gradually turns pink as it extracts the wine.
After the initial treatment, rinse the area thoroughly with cold water. For persistent stains, create a powerful cleaning solution by mixing equal parts hydrogen peroxide and liquid dish soap. Apply this mixture gently to the stain using a clean cloth or soft brush, working from the outside edges toward the center to prevent spreading. Let it sit for five to ten minutes, then rinse completely with cold water. Wash the garment in the coldest water safe for the fabric according to care label instructions. Commercial wine stain removers containing fruit and vegetable extracts offer an alternative non-toxic solution and have proven highly effective according to cleaning experts, but the homemade hydrogen peroxide method works remarkably well for most wine emergencies.
Blood Stain Removal

Blood stains present unique challenges in stain removal because they contain proteins that bond firmly with fabric fibers, and these proteins coagulate when exposed to heat, making the stain virtually permanent. This is why understanding proper blood stain removal techniques is crucial for anyone who might experience minor cuts, nosebleeds, or other accidents. The cardinal rule for blood stains bears repeating: always use cold water, never hot or warm.
For fresh blood stains, time is your greatest ally. Immediately rinse the stained area under cold running water, allowing the stream to flush the blood from the back of the fabric. This backwards approach prevents the blood from penetrating deeper into the material. If you’re at home, fill a basin with cold water and let the garment soak for at least thirty minutes. While soaking, gently rub the fabric against itself to help loosen the blood particles. If you notice the water turning pink, drain it and refill with fresh cold water, continuing until the water runs clear.
After soaking, apply an enzyme-based laundry detergent directly to any remaining stain. Enzyme detergents contain special proteins that break down biological stains like blood at a molecular level. For delicate fabrics such as silk or wool, substitute a mild detergent mixed with cold water and gently squeeze the solution through the fabric rather than rubbing. Let the detergent sit on the stain for at least fifteen minutes before washing in cold water. For dried or older blood stains, you’ll need more patience and stronger treatment. Create a presoak solution using cold water and one to two teaspoons of liquid laundry detergent or an oxygen bleach product. Allow the garment to soak overnight, then pretreat with additional detergent and wash with fabric-safe bleach. You may need to repeat this process several times for stubborn dried blood stains, but persistence typically pays off. Some people swear by using hydrogen peroxide on white fabrics or crushing aspirin tablets into a paste with water for particularly difficult blood stains.
Oil and Grease Stain Removal
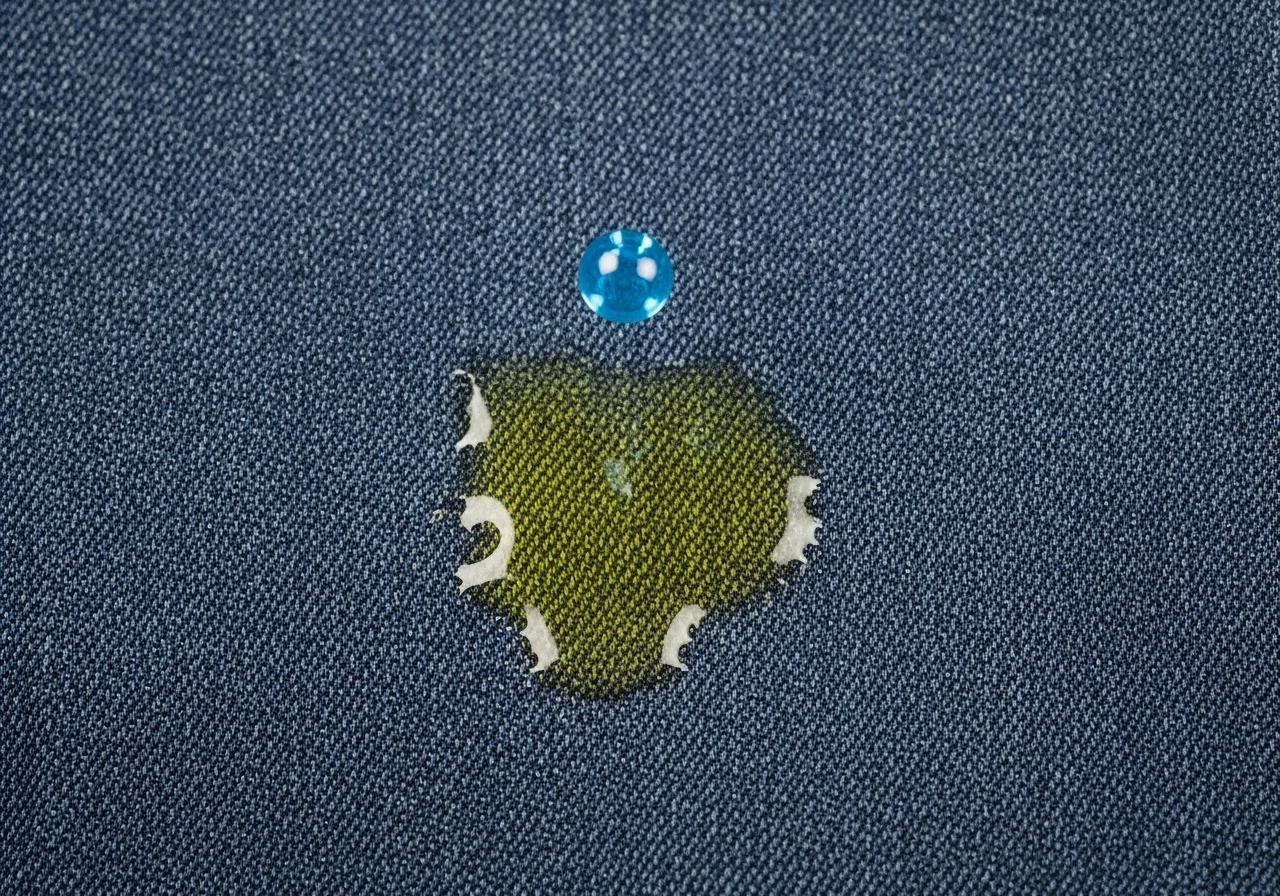
Oil and grease stains from cooking, salad dressings, or even body oils present particularly stubborn challenges because oil molecules bond tightly with synthetic fibers and permanent press fabrics. These stains often appear innocuous at first but become increasingly visible and difficult to remove once heat from a dryer sets them permanently into the fabric. Effective oil stain removal requires breaking down these molecular bonds before they become part of your garment’s permanent appearance.
The first step in treating any oil or grease stain involves removing excess oil from the fabric surface. Blot the area immediately with a clean paper towel or cloth, applying gentle pressure to absorb as much oil as possible without spreading it to clean areas. For solid greasy substances, use a dull knife or spoon edge to carefully scrape away the excess material. Next, apply a grease-cutting agent directly to the stain. Liquid dish soap, specifically formulated to cut through cooking grease, works exceptionally well for this purpose. Place a small amount on your fingertips and work it into the stained area using gentle circular motions.
For particularly stubborn grease stains, cornstarch or baby powder can serve as powerful oil absorbents. Cover the stain completely with either powder and let it sit for at least one hour, preferably overnight. The powder will gradually absorb the oil from the fabric fibers. After waiting, brush away the powder and assess whether the stain has lightened. You may need to repeat this process multiple times for heavy grease stains. Once you’ve pretreated with dish soap and absorbed as much oil as possible, wash the garment in the hottest water safe for the fabric according to its care label. Check the stained area carefully before putting the garment in the dryer. If any shadow of the stain remains, treat it again because heat will lock in any remaining oil permanently. Some fashion experts also recommend using hairspray or WD-40 as alternative grease fighters, though these should be tested on hidden areas first and require thorough washing afterward.
Makeup Stain Removal
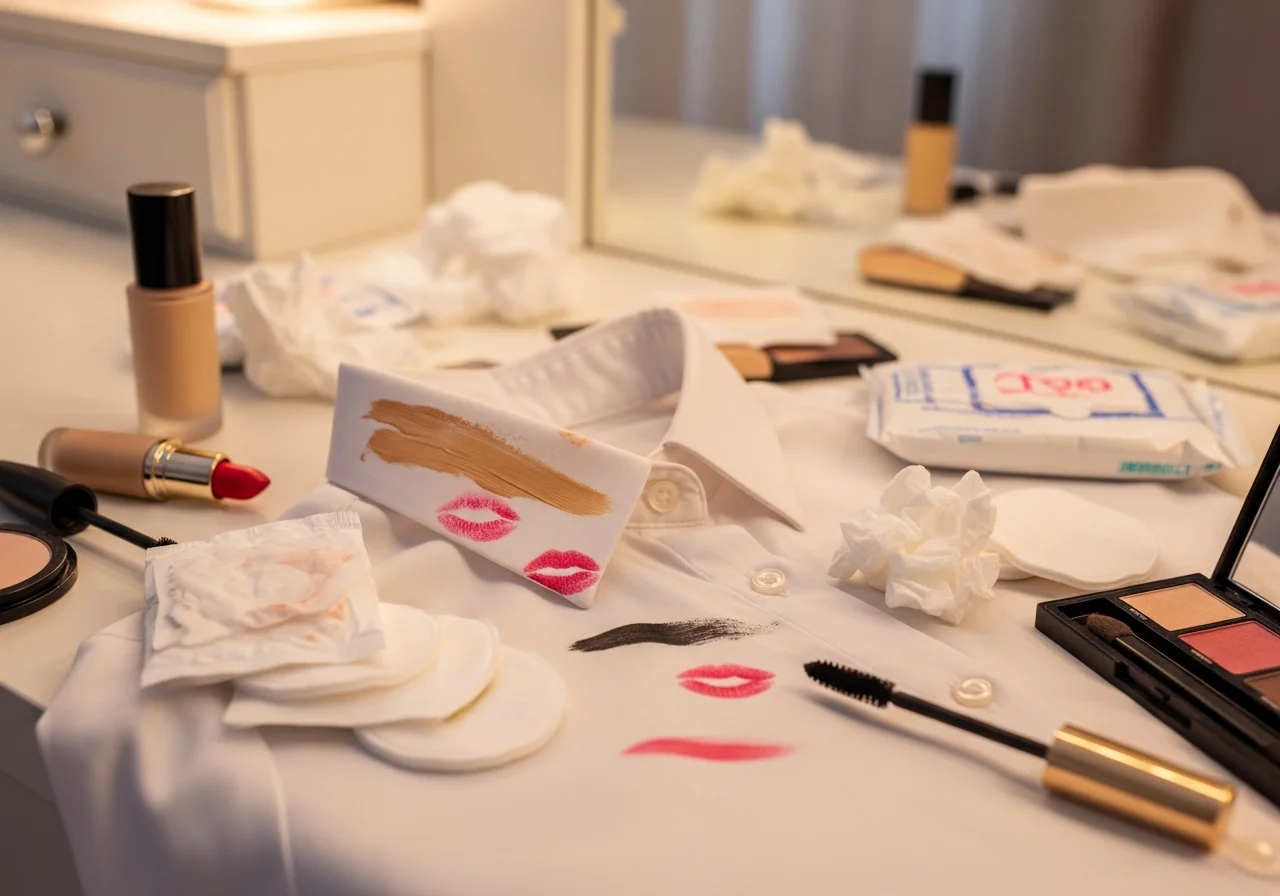
Makeup stains rank high on the list of frustrating fashion emergencies because they combine multiple challenging elements: oils, waxes, and pigments. Foundation transfers onto collars, lipstick smears across sleeves, and mascara marks on pillowcases are all too familiar scenarios for makeup wearers. Understanding the composition of different makeup products helps you choose the most effective makeup stain removal method for each situation.
For foundation stains, which are typically oil-based, start by removing any excess product using a dull knife or spoon edge, scraping gently without pushing the makeup deeper into the fabric. Never rub makeup stains initially, as this spreads the pigment and drives it into the fibers. Instead, use a makeup remover wipe or micellar water to dissolve the oils in the foundation. If you don’t have these specialized products available, a small amount of gentle shampoo works surprisingly well since it’s designed to remove oils from hair without harsh abrasion. Apply your chosen treatment to the stain and let it sit for five to ten minutes.
Lipstick stains require special attention due to their waxy, highly pigmented nature. These stains rank among the most difficult to remove completely. Surprisingly, petroleum jelly can help remove lipstick because it dissolves the waxy base. Dab a small amount onto the stain, let it sit briefly, then wipe clean. Follow this by treating the area as you would any grease stain, using dish soap to cut through the remaining oils. For mascara and eyeliner, which contain different formulations than other makeup products, use eye makeup remover or create a mixture of dish soap and water. Apply the solution with a soft cloth, blotting gently rather than rubbing to prevent the black pigment from spreading.
After pretreating makeup stains with these targeted methods, apply liquid laundry detergent directly to the affected area. Use a soft-bristled toothbrush to work the detergent into the fabric fibers, which helps break up any remaining makeup particles. Rinse thoroughly in the hottest water safe for the fabric, checking that all traces of makeup have disappeared before machine washing. For delicate fabrics like silk that might be damaged by aggressive treatment, consider taking the garment to a professional cleaner rather than risking damage with at-home remedies.
Ink Stain Removal
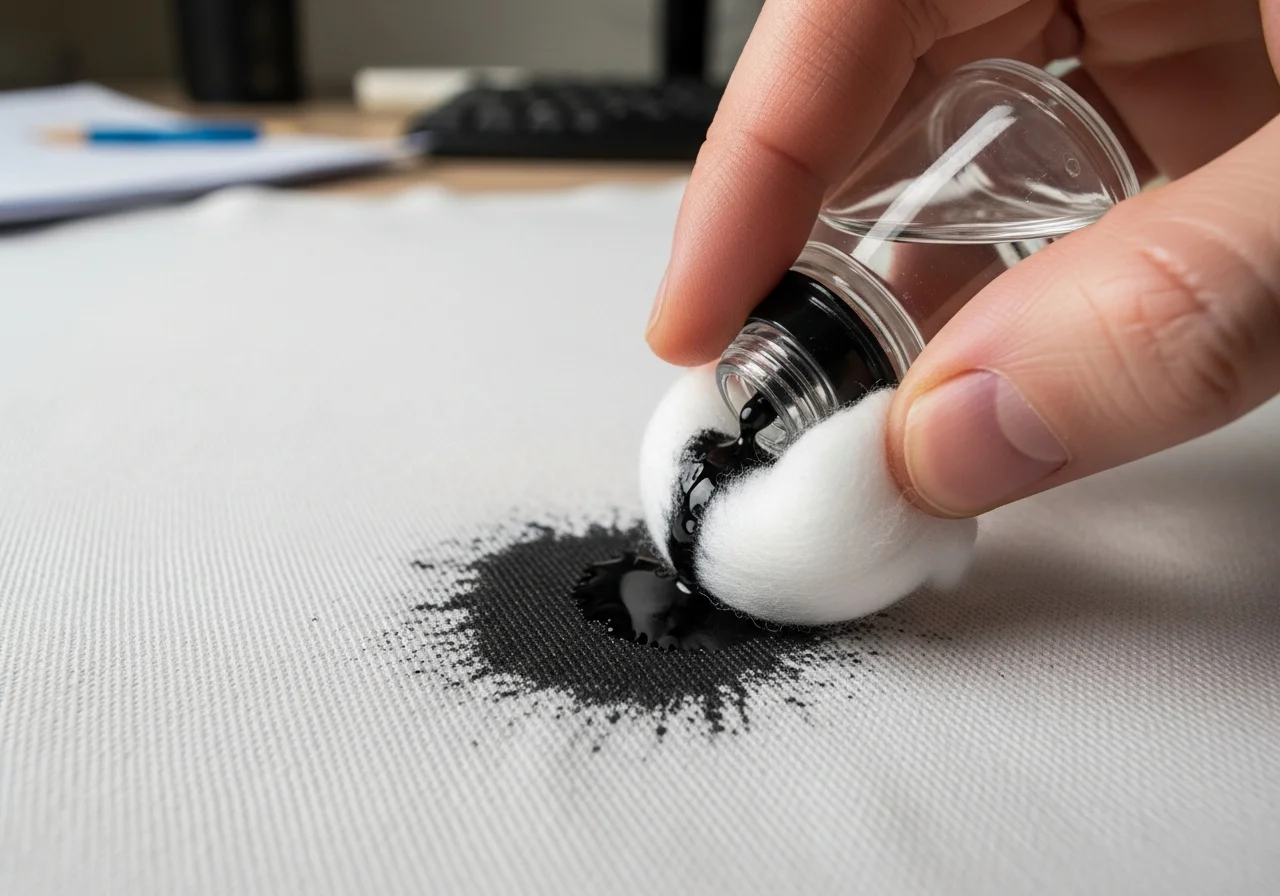
Ink stains from pens, markers, or printer mishaps can seem like permanent disasters, but with the right approach, most ink stains can be successfully removed. The key to effective ink stain removal lies in understanding that different inks have different bases: some are water-soluble, others are oil-based, and some are alcohol-based. This diversity means you may need to try several methods to find what works for your particular ink stain.
Before treating an ink stain, protect the rest of your garment by placing a clean, absorbent cloth between the front and back layers of fabric. This prevents the ink from transferring to the opposite side during treatment. One surprisingly effective method involves using clear hand sanitizer, which contains alcohol that can dissolve many types of ink. Apply the sanitizer generously to the stain and blot gently with a damp paper towel. The alcohol in the sanitizer breaks down the ink particles, allowing them to transfer to the towel. Continue applying sanitizer and blotting until no more ink transfers.
Another proven technique uses milk as an overnight soaking solution. Submerge the stained portion of the garment completely in a bowl of whole milk and let it sit overnight. The emulsion properties of milk attract both oil and water, making it effective against many ink types. In the morning, if slight traces of ink remain, gently rub the fabric to work out the stain before running it through a normal wash cycle. For ballpoint pen ink specifically, rubbing alcohol or surgical spirit applied with a cotton ball works remarkably well. Dab the alcohol onto the stain, working from the outer edges toward the center to prevent spreading. You’ll see the ink begin to dissolve and transfer to the cotton ball. Replace the cotton ball frequently as it becomes saturated with ink.
Hairspray containing alcohol can also remove some ink stains. Spray it directly onto the mark and allow it to dry completely before wiping with a makeup removal cloth. For particularly stubborn ink stains or those on delicate fabrics, professional dry cleaning may be your safest option. Never put a garment with ink stains in the dryer until you’re certain the stain has been completely removed, as heat will make the ink permanent and potentially impossible to remove even with professional help.
Grass Stain Removal
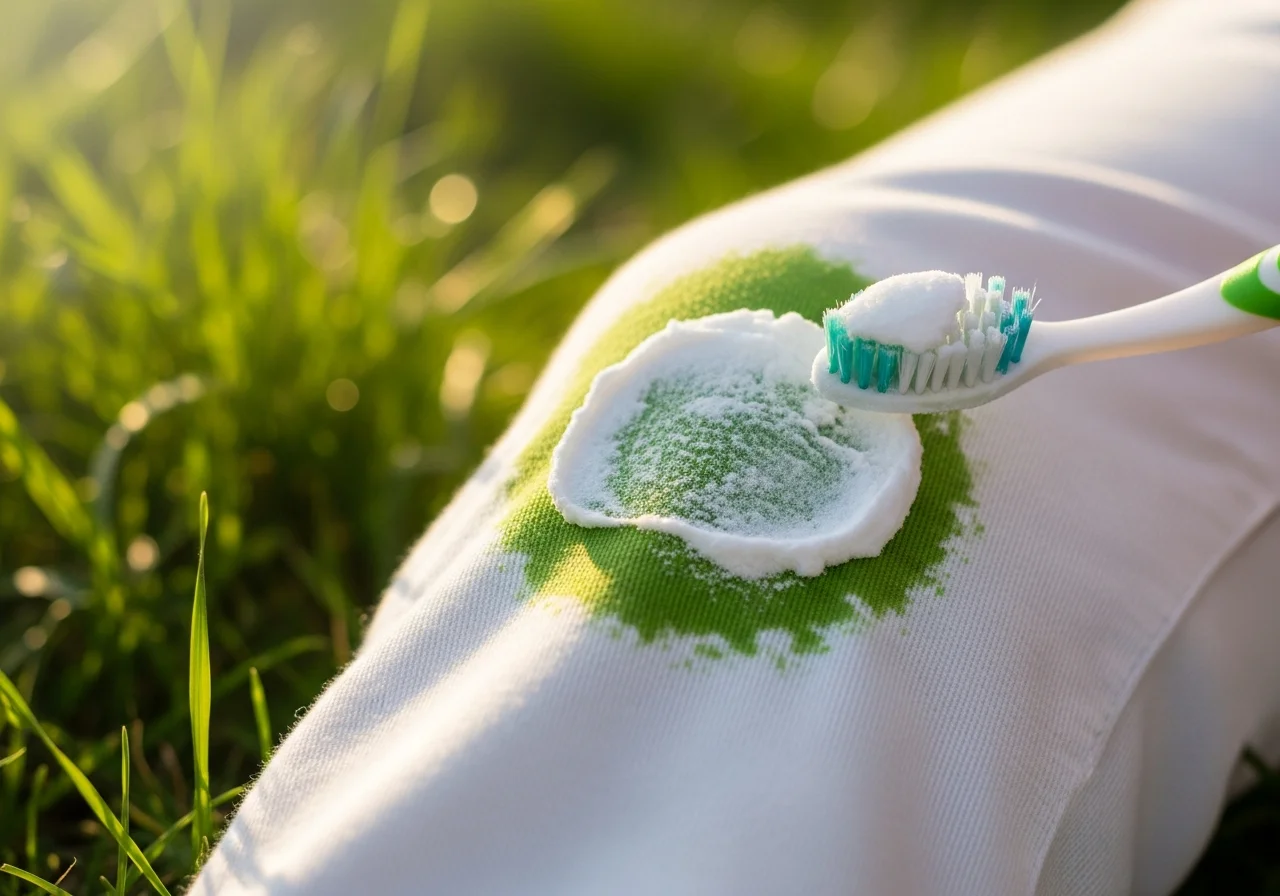
Grass stains contain chlorophyll, tannins, and protein components that create their characteristic green appearance and stubborn nature. These complex organic compounds make grass stain removal challenging, but not impossible. Whether from outdoor activities, sports, or gardening, grass stains require specific treatment approaches to break down their multiple stain-causing elements effectively.
White vinegar emerges as a powerful ally against grass stains due to its mild acidity, which helps break down the organic compounds without damaging most fabrics. Mix equal parts white vinegar and water in a small bowl or spray bottle. Apply this solution generously to the grass stain and let it penetrate the fabric for at least ten to fifteen minutes. The acetic acid in vinegar works to dissolve the chlorophyll that gives grass stains their green color. After the vinegar treatment, gently work the fabric together with your hands or use a soft brush to help lift the stain particles from the fibers.
For particularly stubborn grass stains, create a paste using baking soda and a small amount of water. Apply this paste directly to the stain and scrub gently with an old toothbrush using circular motions. The mild abrasive quality of baking soda combined with its alkaline nature helps break down the protein and tannin components of grass stains. Let the paste sit on the stain for fifteen to twenty minutes before rinsing with cold water. Enzyme-based laundry detergents also work exceptionally well on grass stains because they contain biological catalysts that break down organic material at a molecular level.
Apply enzyme detergent directly to the grass stain and allow it to sit for at least thirty minutes before washing. For white fabrics, you can enhance stain removal by placing the treated garment in direct sunlight for a few hours before washing. The sun’s natural bleaching effect helps fade the remaining green tinge. Wash the garment in the hottest water safe for the fabric according to care label instructions. If any trace of the stain remains after washing and air-drying, repeat the treatment process. Never use hot water initially on grass stains, as heat can set the protein components, making them much more difficult to remove in subsequent attempts.
Sweat and Deodorant Stain Removal
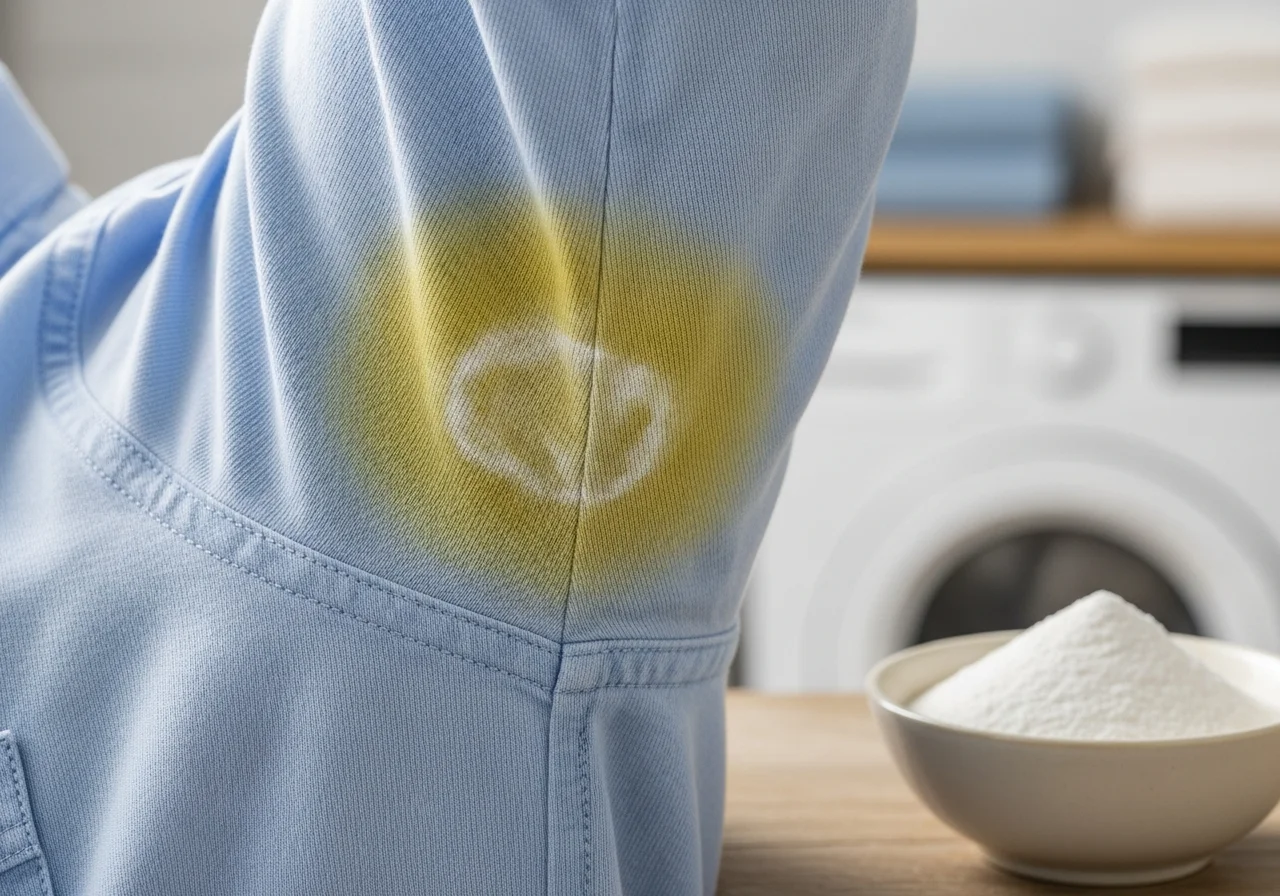
Sweat and deodorant stains present a double challenge: yellow discoloration from perspiration and white residue from antiperspirant products. These stains typically appear in the underarm areas of shirts and blouses, gradually building up over time if not properly addressed. Understanding effective sweat stain removal techniques helps preserve your favorite garments and extends their wearable life significantly.
Fresh deodorant marks often come off with surprisingly simple methods. Try rubbing the fabric against itself, which can release the deodorant residue without any additional treatment. If this doesn’t work, a damp cloth used to gently dab at the mark usually removes it. Non-toxic baby wipes also work remarkably well for removing fresh deodorant residue from both cotton and polyester fabrics. Simply wipe the stained area gently with a baby wipe, and the residue typically comes off easily.
Yellow sweat stains require more intensive treatment because they result from a chemical reaction between your body’s perspiration and the aluminum compounds in antiperspirants. For cotton fabrics, create a powerful stain-fighting mixture using equal parts white vinegar and water. Apply this solution directly to the yellowed areas and gently rub the fabric together before rinsing with cold water. For synthetic fabrics, use a small amount of clear, grease-fighting dish soap mixed with cold water. Apply this solution to the stain, gently work it into the fabric, and rinse thoroughly with cold water.
Baking soda emerges as another effective weapon against sweat stains. Make a paste using four tablespoons of baking soda mixed with a quarter cup of water. Apply this paste generously to the yellowed areas and scrub gently with an old toothbrush. The alkaline nature of baking soda neutralizes the acidic compounds in sweat while helping to lift the stain from fabric fibers. Let the paste sit on the stain for at least one hour, or overnight for severe staining, before washing in the hottest water safe for the fabric. For particularly stubborn yellowing that has built up over time, you may need to repeat this process several times. Some fashion experts recommend applying ammonia to fresh perspiration stains or white vinegar to older ones, rinsing thoroughly afterward. Oxygen-based bleach products also work well for removing yellowing from white garments when used according to package directions.
Chocolate Stain Removal
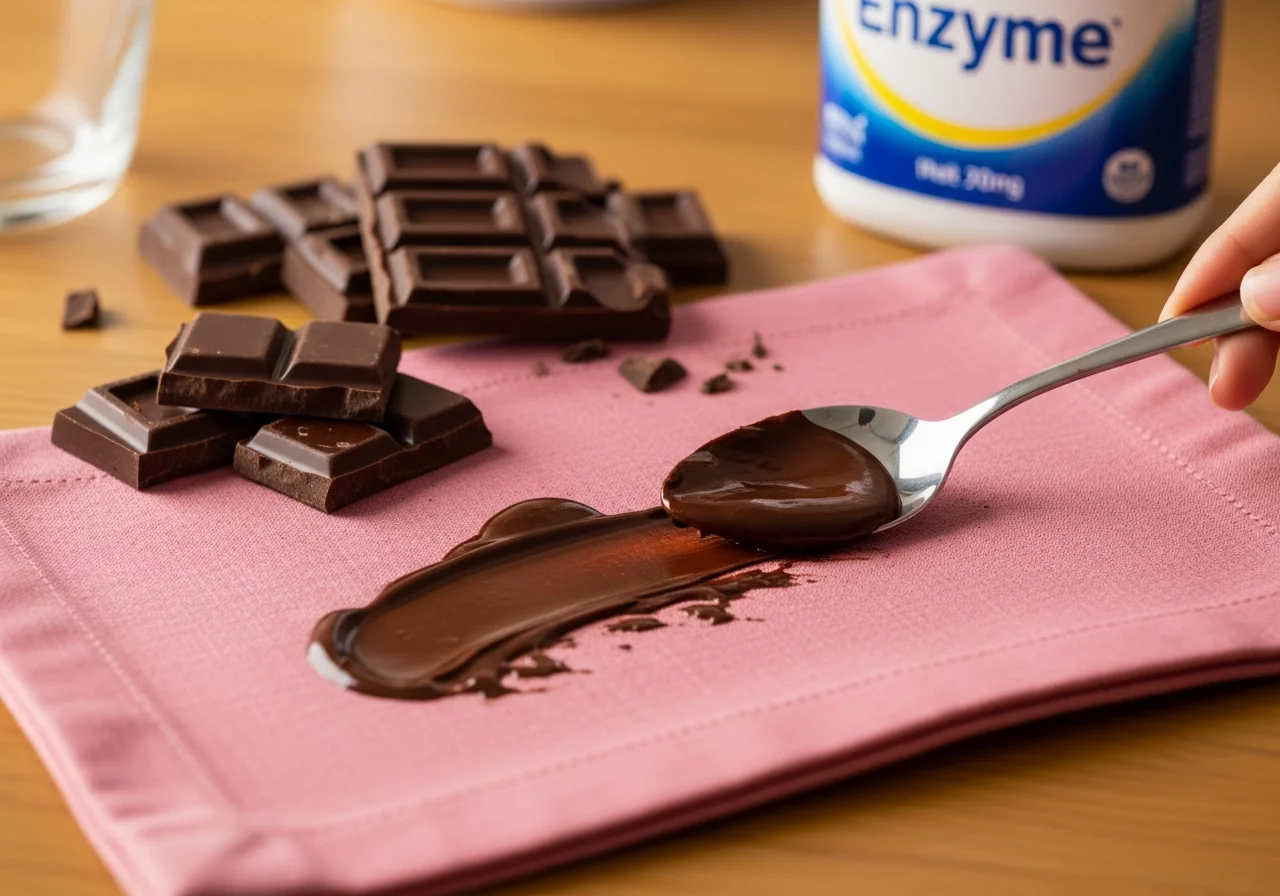
Chocolate stains combine the challenges of oil-based and protein-based stains, making chocolate stain removal require a multi-step approach. Whether from a melting candy bar, chocolate dessert, or hot cocoa spill, acting quickly prevents these stains from setting into fabric fibers permanently. The fats, proteins, and dark pigments in chocolate all need targeted treatment for complete removal.
Begin chocolate stain removal by removing excess chocolate from the fabric surface. Use a dull knife or spoon edge to gently scrape away any solid chocolate pieces without pushing them deeper into the fabric or spreading them to clean areas. Avoid the temptation to wipe or rub at this stage, as this will only embed the stain further. After removing the excess, flush the stained area with cold water from the back of the fabric. This backwards flushing technique helps push the stain out rather than driving it deeper into the material.
Next, address the protein component by soaking the garment in cold water mixed with enzyme detergent. If you’re treating a delicate fabric such as silk, cashmere, or fine wool, substitute a mild detergent and squeeze the cleaning solution through the fabric gently rather than rubbing. Allow the garment to soak for at least thirty minutes, which gives the enzymes time to break down the protein molecules in the chocolate. After soaking, apply liquid laundry detergent directly to any remaining stain and use your fingers or a soft brush to work it into the fabric fibers.
The final washing step should use the warmest water safe for your specific fabric, as listed on the care label. Hot water helps dissolve the cocoa butter and other fats in chocolate more effectively than cold water, but only use it if your fabric can tolerate higher temperatures. Check the stained area carefully before placing the garment in the dryer. If any shadow of the stain remains, repeat the entire treatment process. Heat from the dryer will permanently set any remaining chocolate stain, making it nearly impossible to remove afterward. For chocolate stains on delicate or dry-clean-only fabrics, taking the garment to a professional cleaner immediately after removing excess chocolate gives you the best chance of complete stain removal without damaging the fabric.
Tomato Sauce Stain Removal
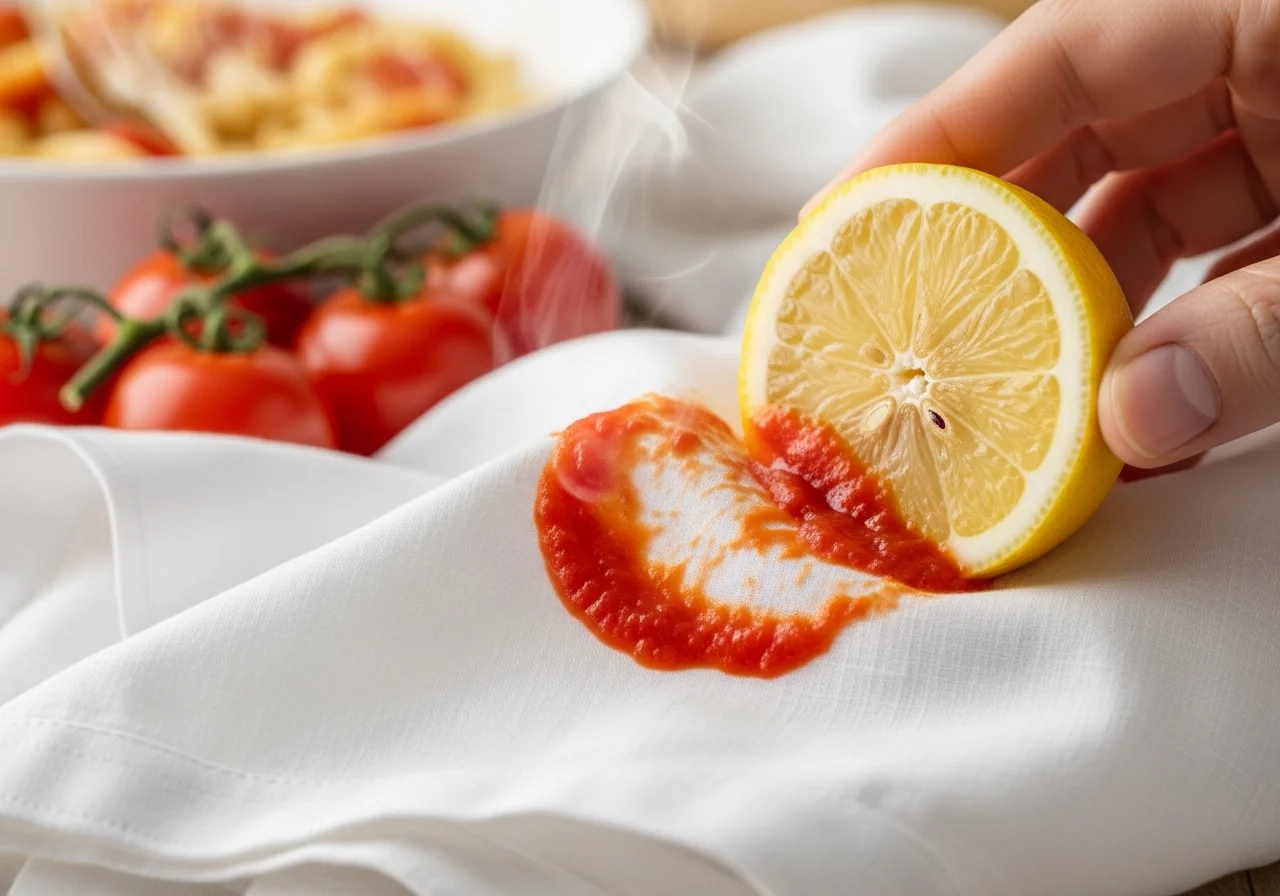
Tomato-based stains from pasta sauce, ketchup, or pizza combine acidic properties with oil content and vibrant pigmentation, creating one of the most visible and stubborn stain challenges. The lycopene pigment that gives tomatoes their red color bonds strongly with fabric fibers, while the oils in prepared sauces add an additional layer of complexity to tomato sauce stain removal.
Start by removing any excess sauce using a dull knife or spoon, scraping gently from the outside of the stain toward the center. Then flush the stained area immediately with cold water from the back of the fabric, which helps push the stain out of the fibers. For fresh tomato stains, this initial cold water flush can remove a surprising amount of the discoloration. After rinsing, apply a prewash stain remover or liquid laundry detergent directly to the affected area and allow it to sit for five to ten minutes.
The acidic nature of tomatoes means you can harness natural bleaching power to help fade the red stain. Apply fresh lemon juice or a slice of lemon directly to the stained area, rubbing gently. The citric acid in lemon juice works to break down the tomato pigments. Let the lemon juice sit on the fabric for several minutes before flushing with cold water. For an enhanced effect, place the garment in direct sunlight for an hour or two after treating with lemon juice. The combination of citric acid and UV rays from the sun provides natural bleaching action that can significantly fade tomato stains, particularly on white fabrics.
For the washing stage, use hot water if the fabric care label permits, as heat helps break down tomato stains more effectively than cold water. However, make sure you’ve pretreated thoroughly first, because hot water can also set untreated tomato stains. Add oxygen-based bleach to the wash cycle for white or colorfast fabrics, which provides additional stain-fighting power. After washing, check the stained area carefully before drying. If any pink or orange discoloration remains, treat it again with lemon juice and sunlight before rewashing. Never place a garment with tomato stains in the dryer until you’re absolutely certain the stain has been completely removed, as heat will lock in any remaining discoloration permanently.
Mud and Dirt Stain Removal

Mud and dirt stains might seem straightforward, but they actually require patience and a specific sequence of steps for complete mud stain removal. The natural instinct to immediately rinse mud from fabric often makes the problem worse by driving the dirt particles deeper into the material. Instead, successful mud stain removal begins with allowing the mud to dry completely.
This counterintuitive first step is crucial. Wet mud contains moisture that helps it penetrate fabric fibers, while dried mud becomes brittle and easier to remove mechanically. Once the mud has dried thoroughly, take the garment outside and shake it vigorously to remove loose dirt particles. Use a stiff brush or the edge of a dull knife to gently scrape away the dried, caked-on mud, working from the outside edges of the stain toward the center. You’ll be surprised how much dried mud comes off with this simple mechanical action.
After removing the bulk of dried mud, pretreat the remaining stain with liquid laundry detergent or a specialized stain remover. Work the detergent into the fabric using your fingers or a soft brush, paying special attention to any remaining discolored areas. If the mud came from an area with red clay or particularly pigmented soil, you may need a more aggressive pretreatment. Create a paste using powdered laundry detergent and a small amount of water, apply it to the stain, and let it sit for thirty minutes before washing.
Wash the garment in the hottest water safe for the fabric, using your regular laundry detergent. For white or colorfast items, adding oxygen-based bleach to the wash cycle can help remove any lingering discoloration from mineral deposits in the dirt. After washing, check the garment carefully before drying. Sometimes mud stains require multiple wash cycles for complete removal, particularly if the soil contained iron or other minerals that leave behind stubborn pigments. If any stain remains, repeat the pretreatment and washing process. Once the stain has completely disappeared, you can safely dry the garment. For particularly stubborn mud stains on durable fabrics like denim, some people have success using white vinegar as a presoak before the detergent treatment stage.
Mustard Stain Removal
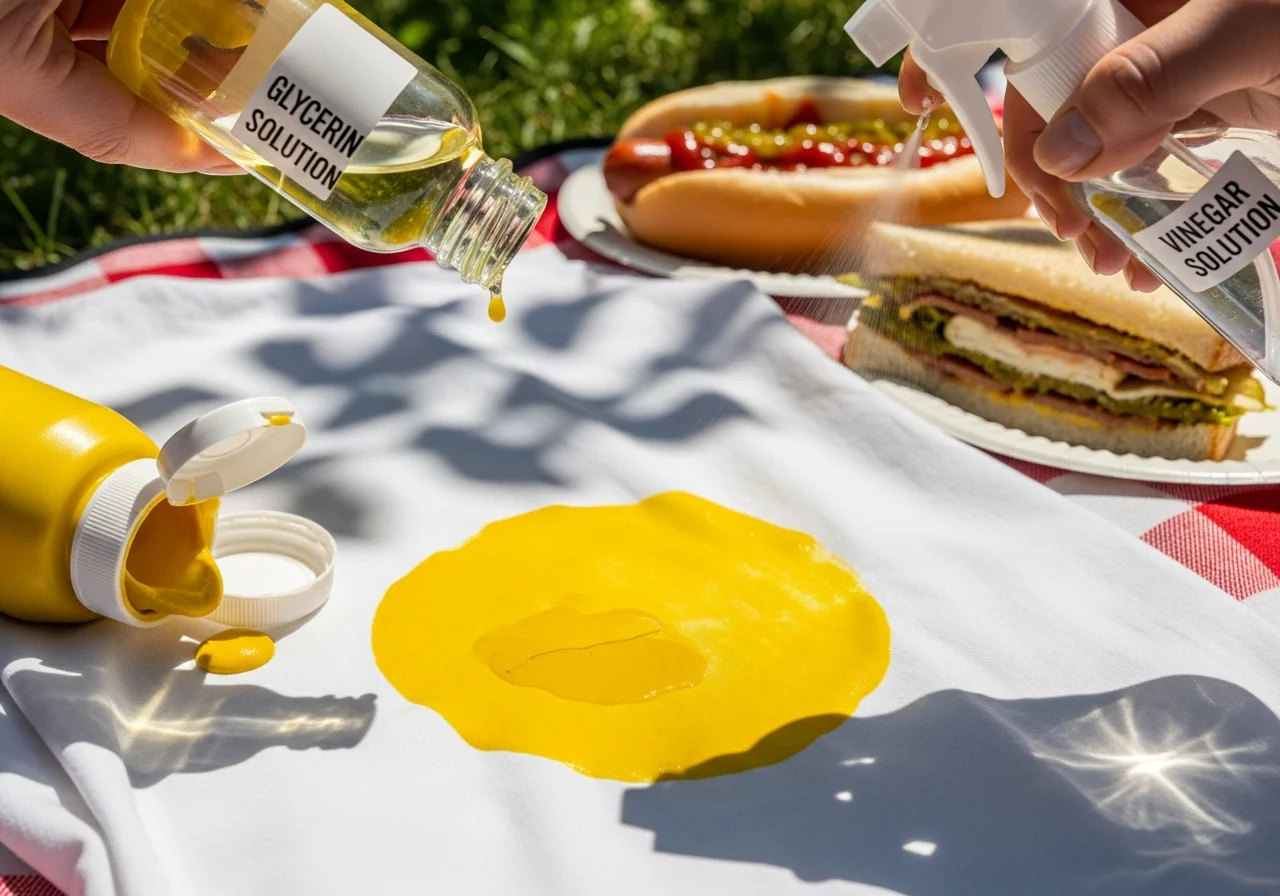
Mustard stains present one of the most challenging scenarios in stain removal due to turmeric, the bright yellow spice that gives mustard its distinctive color. Turmeric contains curcumin, a powerful natural dye that bonds tenaciously with fabric fibers. This makes mustard stain removal notably difficult, but not impossible with proper technique and persistence.
The moment mustard contacts your clothing, act immediately. Use a dull knife or spoon to remove as much excess mustard as possible, scraping gently without spreading the stain or rubbing it deeper into the fabric. After removing the excess, resist the urge to rinse with water immediately. Instead, apply glycerin or a few drops of liquid dish soap directly to the stain. These substances help break down the oils in the mustard while preparing the turmeric pigment for removal. Gently work the glycerin or soap into the fabric using your fingertips, then let it sit for at least five minutes.
After the initial treatment, flush the stained area with cold water from the back of the fabric. Then create a powerful stain-fighting solution by mixing equal parts white vinegar and liquid laundry detergent. Apply this mixture generously to the yellow stain and let it sit for fifteen to thirty minutes. The acetic acid in vinegar helps break down the curcumin pigment while the detergent tackles the oily components of the mustard.
One of the most effective weapons against mustard stains is natural sunlight. After pretreating, place the damp garment in direct sunlight for several hours. The ultraviolet rays naturally bleach the turmeric pigment, gradually fading the yellow color. This sun-bleaching method works particularly well on white and light-colored fabrics. After sun exposure, wash the garment in the hottest water safe for the fabric with regular laundry detergent. For particularly stubborn mustard stains, you may need to repeat this entire process multiple times. Commercial oxygen-based bleach products also help with mustard stains when added to the wash cycle. Be prepared for mustard stains to require more patience than most other common stains, as the turmeric pigment rarely comes out completely in just one treatment. Multiple rounds of pretreatment, sun exposure, and washing typically achieve the best results.
Rust Stain Removal

Rust stains occur when metal objects like bobby pins, paper clips, or belt buckles come into contact with damp fabric, creating distinctive orange-brown marks. These iron oxide stains present unique challenges because traditional bleach actually makes rust stains worse rather than better. Effective rust stain removal requires acidic treatments that dissolve the iron particles without damaging the fabric.
Lemon juice emerges as one of the most effective natural rust removers. The citric acid in fresh lemon juice chemically reacts with iron oxide to break it down. Squeeze fresh lemon juice directly onto the rust stain until it’s thoroughly saturated. Sprinkle salt over the lemon juice to create a mild abrasive paste. Place the garment in direct sunlight and let it sit for several hours. The combination of citric acid, salt abrasion, and ultraviolet light creates a powerful rust-removing treatment. Check the stain periodically, reapplying lemon juice if it begins to dry out.
After several hours of sun treatment, rinse the area thoroughly with cold water and assess the stain. For stubborn rust marks, repeat the lemon-salt-sun treatment. Once the stain has lightened significantly or disappeared, wash the garment normally. White vinegar provides an alternative acidic treatment for rust stains. Apply undiluted white vinegar to the affected area and let it sit for at least thirty minutes. The acetic acid in vinegar also breaks down iron oxide, though typically less aggressively than lemon juice.
Commercial rust removers are available and can be highly effective, but they must be used carefully according to package directions. These products typically contain oxalic acid or hydrofluoric acid, which are powerful rust dissolvers but can damage fabrics if used improperly. Always test commercial rust removers on a hidden area of the garment first. Never use chlorine bleach on rust stains, as it sets the stain permanently through a chemical reaction with the iron oxide. For valuable or delicate garments with rust stains, professional dry cleaning offers the safest removal method. Professional cleaners have access to specialized rust-removing chemicals and the expertise to use them without damaging fabrics.
Candle Wax Stain Removal
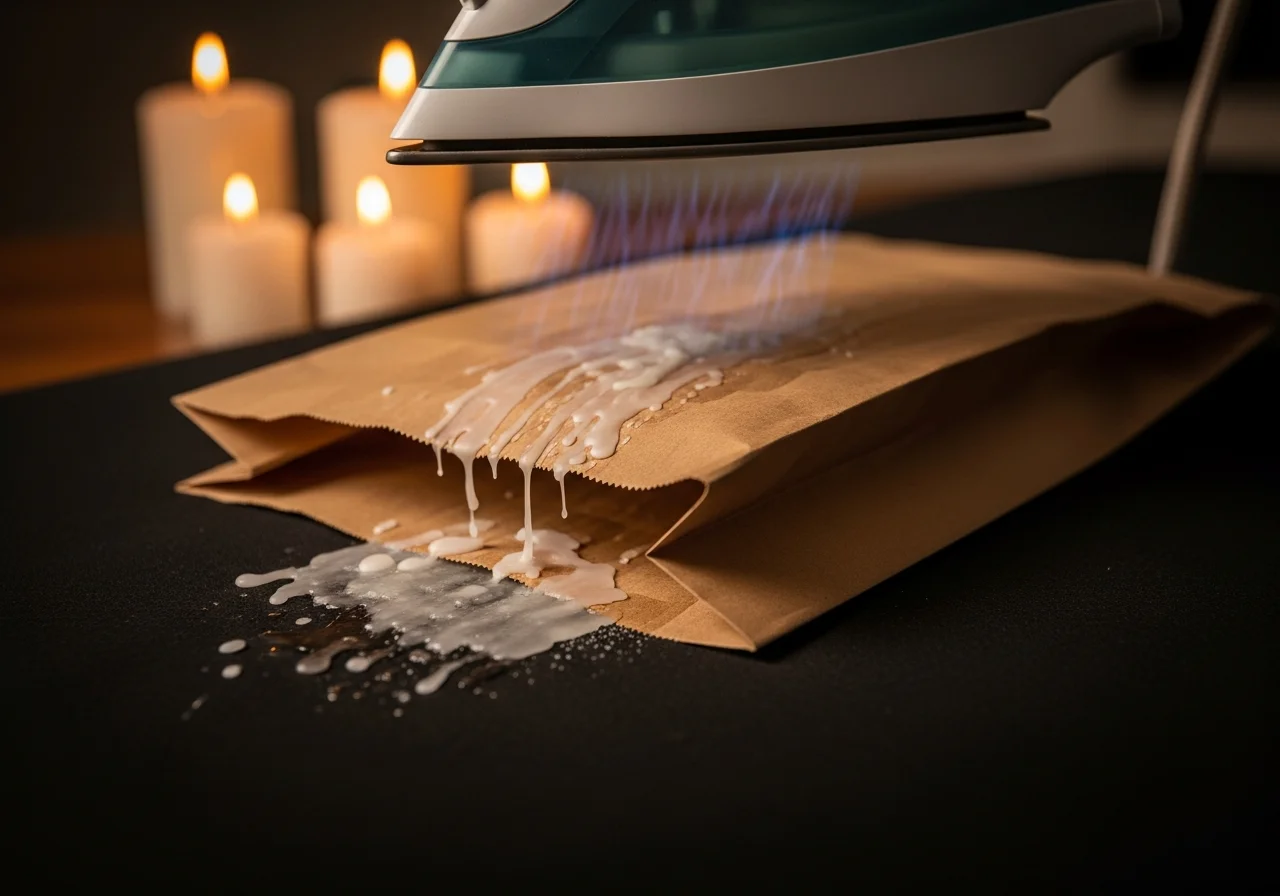
Candle wax stains might seem daunting, but candle wax stain removal actually follows a straightforward process once you understand the technique. Wax stains combine solidified oils that harden onto fabric surfaces, requiring both mechanical removal and solvent treatment for complete elimination. The key lies in addressing both the solid wax and the dye or oil residue it leaves behind.
First, allow the wax to harden completely if it hasn’t already. Attempting to remove soft or warm wax will only spread it further across the fabric. Once hardened, place the garment in your freezer for about thirty minutes. The extreme cold makes the wax even more brittle and easier to break away from the fabric fibers. After freezing, use a dull knife or your fingernails to crack and scrape away as much solid wax as possible. Many wax flakes will simply snap off the fabric when properly frozen.
After removing the bulk of the wax mechanically, you’ll need to address the remaining oily residue embedded in the fabric. Place several layers of white paper towels or brown paper bags both under and over the stained area. Using a warm iron on a medium setting, press the iron over the paper. The heat melts any remaining wax, which then transfers into the absorbent paper. Move the garment to fresh sections of paper as the wax transfers, continuing until no more wax absorbs into the paper. Make sure your iron never touches the wax directly, as this will transfer the stain to your iron and potentially to other garments later.
For any remaining oily residue or dye stains from colored candles, apply a solvent-based prewash stain remover or a small amount of rubbing alcohol. Blot the area with a clean white cloth, which should absorb the dissolved dye. Then wash the garment in the hottest water safe for the fabric. If colored wax has left a dye stain, you may need to treat it with an oxygen-based bleach product during washing. For delicate fabrics that cannot withstand heat from an iron, taking the garment to a professional dry cleaner immediately after removing the bulk of the wax provides the best results. Professional cleaners have specialized solvents designed specifically for wax removal that work effectively without heat.
Nail Polish Stain Removal
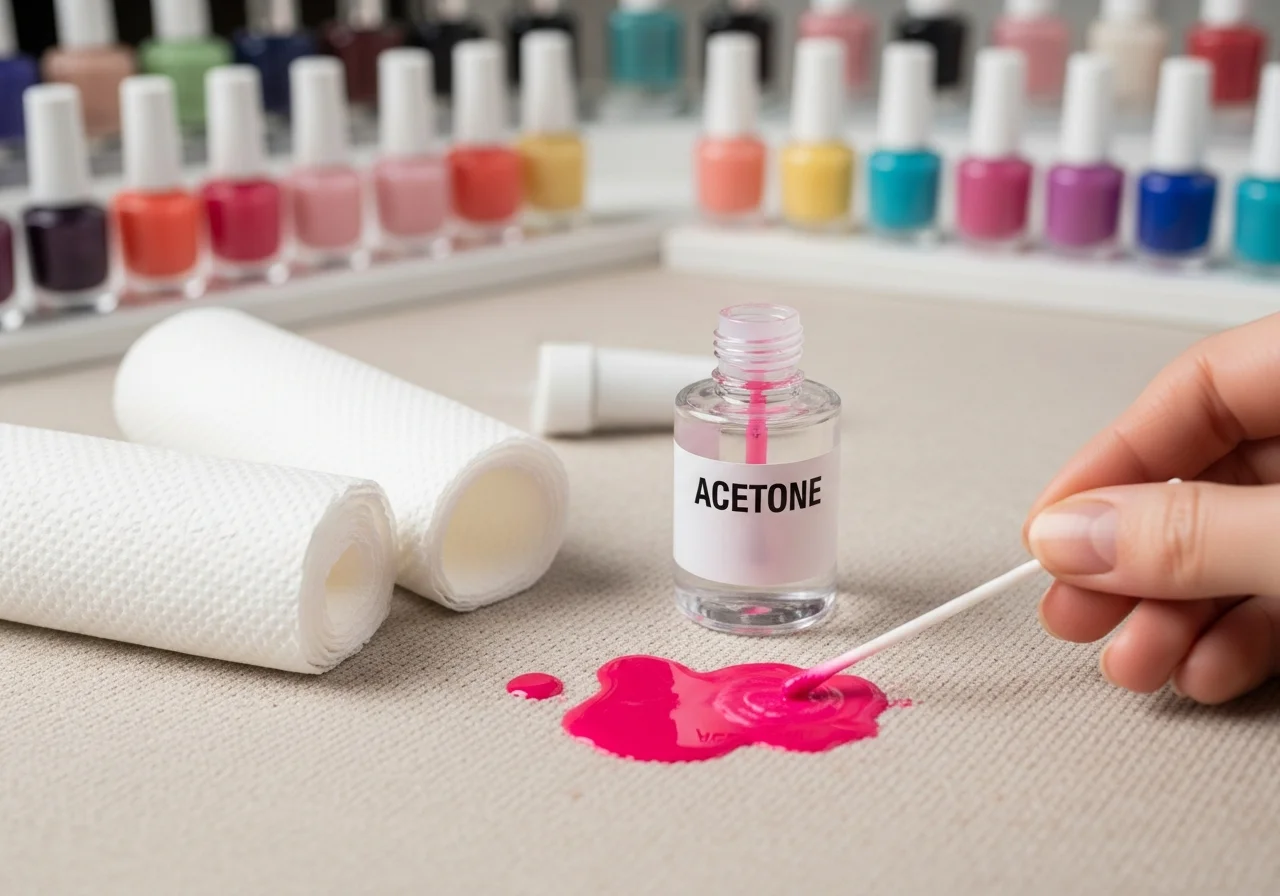
Nail polish stains combine quick-drying resins, pigments, and solvents into one of the most challenging stain scenarios. The same properties that make nail polish stay on nails for days also make nail polish stain removal extremely difficult once it dries on fabric. Time is absolutely critical when dealing with nail polish spills, as dried polish may be impossible to remove completely from certain fabrics.
If you catch a nail polish spill while it’s still wet, immediately blot away as much excess polish as possible using a clean white cloth or paper towel. Work from the outside edges toward the center to prevent spreading the stain. Do not rub, as this drives the polish deeper into fabric fibers. Once you’ve removed the excess, place the garment on a thick layer of white paper towels with the stained side face down. This setup ensures that as you treat the stain from the back, the dissolved polish transfers into the paper towels rather than spreading to other areas of the garment.
Pour a small amount of pure acetone onto the back of the stain. You can use regular nail polish remover if it contains acetone, but pure acetone works more effectively. Dip a clean white rag into acetone and blot the stain repeatedly, pressing it into the paper towels underneath. The acetone dissolves the polish, allowing it to transfer from the fabric into the paper towels. Move the garment to clean sections of paper towel frequently as the polish transfers. Continue this process, working from the outer edges toward the center of the stain, until no more color transfers to the paper towels.
After acetone treatment, wash the garment immediately in the hottest water safe for the fabric to remove any remaining acetone and polish residue. Important considerations: acetone will dissolve acetate fabrics completely and can damage triacetate and some synthetic materials. Always test acetone on a hidden area first if you’re unsure about your fabric content. For delicate fabrics, colored nail polish on permanent press materials, or any situation where you’re uncertain about fabric compatibility with acetone, professional dry cleaning offers the safest option. Be realistic about expectations with nail polish stains. Some may be impossible to remove completely, especially if they’ve dried thoroughly or if the fabric is particularly delicate. In these cases, creative solutions like strategic embroidery, patches, or decorative elements might transform the damaged area into a design feature.
Prevention and Quick Response Strategies
The most effective stain removal technique is preventing stains from setting in the first place. Understanding prevention strategies and knowing how to respond immediately when accidents happen saves countless garments from permanent damage. This proactive approach to stain management should become second nature for anyone who cares about maintaining their wardrobe.
Always carry a portable stain treatment pen in your purse or keep one in your office desk drawer. These convenient tools allow you to treat fresh stains within minutes, significantly improving removal success rates. When eating or drinking, particularly with highly staining substances like red wine, coffee, or tomato-based foods, take a moment to tuck a napkin into your collar or drape it across your lap. This simple precaution catches spills before they reach your clothing.
Read and follow garment care labels religiously. These tags provide crucial information about which cleaning methods and temperatures are safe for specific fabrics. Washing a delicate silk blouse in hot water or using chlorine bleach on wool will cause irreversible damage regardless of the stain removal method you employ. When trying new stain removal techniques or products, always test them first on a hidden area of the garment, such as an inside seam or hem. This prevents potential disasters from reactions between the cleaning agent and the fabric or dyes.
Keep a well-stocked stain removal kit at home containing white vinegar, baking soda, hydrogen peroxide, liquid dish soap, enzyme-based laundry detergent, and clean white cloths. Having these supplies readily available means you won’t waste precious time searching for treatment materials when a stain emergency occurs. Remember that fresh stains almost always come out more easily than set-in stains, making immediate action your most powerful tool in maintaining a pristine wardrobe.
The fashion-conscious individual who masters these fifteen stain removal techniques gains more than just cleaner clothes. You gain confidence to wear your favorite pieces without constant anxiety about potential accidents. You develop the knowledge to rescue garments that others might discard as ruined. Most importantly, you extend the life of your wardrobe investments while maintaining the polished, put-together appearance that reflects your personal style. Every stain tells a story of life being lived fully, and with these tools, those stories don’t have to end with damaged clothing.
Explore more for men’s capsule wardrobe guide!!
Frequently Asked Questions
What is the most important rule for stain removal?
Act quickly and never apply heat until you’re certain the stain is completely gone. Heat from dryers, irons, or hot water permanently sets most stains by causing chemical bonds between the stain particles and fabric fibers. Always treat stains immediately when they occur, check that removal was successful, and air dry the garment before using any heat sources.
Can I use the same stain removal method for all fabric types?
No, different fabrics require different approaches. Delicate materials like silk, wool, and cashmere need gentler treatment with mild detergents and cool water, while durable cotton and linen can withstand more aggressive methods including hot water and stronger chemicals. Always check the care label before treating any stain and test your chosen method on a hidden area first to ensure it won’t damage or discolor the fabric.
Why should I use cold water for blood and protein stains?
Hot or warm water causes proteins to coagulate and bond permanently with fabric fibers, making protein-based stains like blood, egg, or dairy essentially impossible to remove once heat is applied. Cold water keeps proteins in a liquid state, allowing them to be flushed from the fabric. This fundamental principle applies to all stains containing biological proteins.
What household items work best for emergency stain treatment?
White vinegar, baking soda, dish soap, and hydrogen peroxide form the foundation of effective home stain removal. White vinegar works on tannin stains like coffee and tea, baking soda absorbs oils and odors, dish soap cuts through grease, and hydrogen peroxide bleaches and disinfects. Keep these four items stocked in your laundry area for handling most common stain emergencies effectively.
When should I take a stained garment to professional cleaners instead of treating it myself?
Take garments to professionals when dealing with dry-clean-only fabrics like silk, delicate or expensive items where the risk of damage outweighs the cost of professional service, combination stains involving multiple components, or stains that remain after multiple home treatment attempts. Professional cleaners have access to specialized solvents and expertise that can save garments when home methods fail.


One Comment